
R2ModMan Guide
R2ModMan is a free, open-source mod manager for Unity-based games like Risk of Rain 2, Valheim, Lethal Company, and Dyson Sphere Program. Once installed, this guide covers everything you need from setting up your first profileand sharing mods with friends, to using r2modman on Steam Deck, Linux, and without Steam. All steps are updated for v3.2.18, released on May 22, 2026.

How to Get Started with R2ModMan
First, launch R2ModMan on your PC and you will see a game selection list on the home screen. The app automatically detects most games installed via Steam, so your game will likely appear right away. If it does not show up, click Browse to manually point R2ModMan to the folder where your game is installed. Once you select your game, click “Select Game” to set it as active. You can also click “Set as Default” so R2ModMan always opens with that game ready to go.
How to Create and Manage Profiles in R2ModMan
Creating and managing profiles lets you maintain different mod setups for the same game without conflicts. Each profile has its own mods, settings, and configuration, so switching between them is like switching between different mod collections without deleting anything.
Create a New Profile
- Open R2ModMan and select your game.
- On the profile screen, click the plus icon or “Create New Profile”.
- Give it a clear name like “Story Mode”, “PvP Setup”, or “Lethal Company Mods”.
- Click Create and the profile becomes active. Any mods you install will go into this profile only.

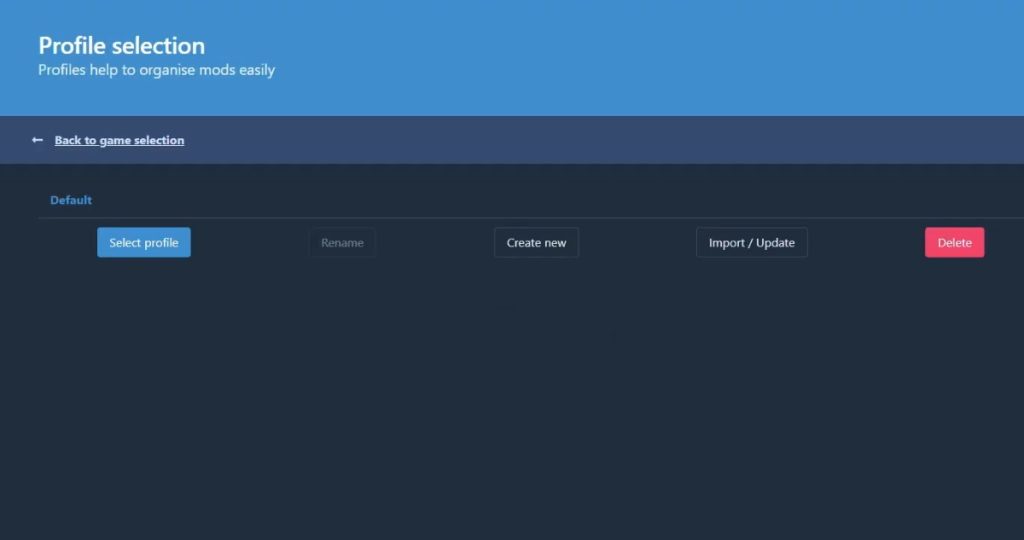
Managing and Using Profiles
- Click your preferred profile to activate it. R2ModMan will switch to that profile and show only the mods enabled in it.
- Any mod downloaded from the Online tab gets installed exclusively into the active profile.
- From the Installed section, you can toggle, enable, or disable mods on a per-profile basis.
- You can also edit mod settings by clicking the Config Editor button within the specific profile.
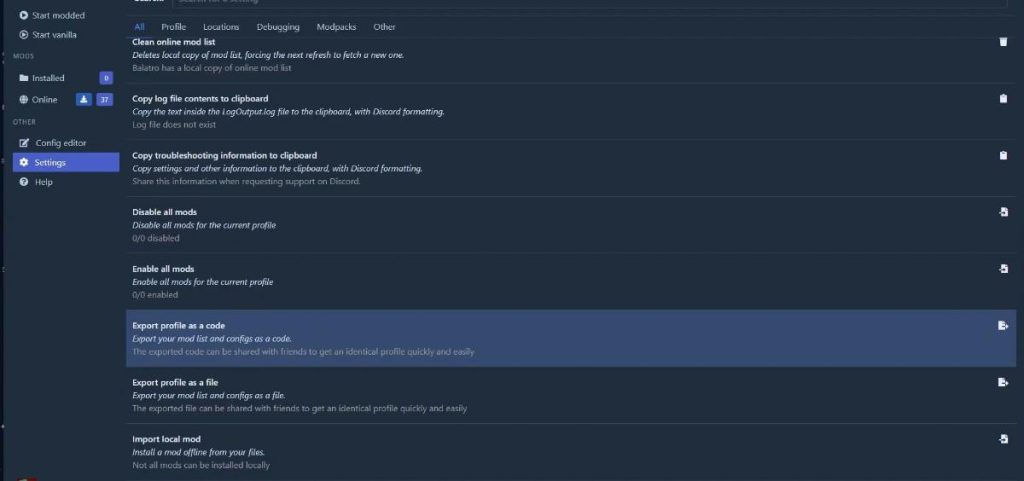
- To share your profile with friends, use the Export Profile as Code option in Settings.
Switch Between Profiles
Go to Settings, open the Profile tab, and click Change Profile. Select the profile you want and you are done.
Import a Profile
Go to Settings, open the Profile tab, and click the “Import/Update” option from the profile selection screen
Now, choose “From File” or “From Code.”
Paste the code or choose the zip file and R2ModMan will create a new profile with the same mod configuration instantly.
Pro Tip:
Keep separate profiles for different playstyles. One for casual play, one for heavy modding, and one for multiplayer with friends.
How to Enable, Disable, and Uninstall Mods in R2ModMan
Enable or Disable Mods
- Open R2ModMan and choose your game. Select your profile, then click the Installed tab from the left menu.
- Find the mod you want to manage and toggle the checkbox next to it.
- Green or Blue means the mod is enabled. Grey means the mod is disabled.
- Once you have made your changes, launch the game using "Start Modded" option.
Why use R2modman?
Using this beneficial mod manager is simple, even if you are using it for the first time. After installing it completely, start using it for modding the games easily.
Open R2 Mod Man and select a game
First, launch the mod manager on your PC. Now, go to the home screen and select the game you want to create a mod for. The r2 modman automatically detects the game file mostly. Choose the game location where you want to download it.
Choose or create a profile
After choosing the game, it will create a by-default profile for you. It allows you to use different mod setups without breaking anything. For casual play, use on profile. Use another profile for heavy modding or multiplayer. Use the profile manager to create profiles anytime.
Browse and install mods
Now, click on the Browse Mods or Online option and search for the mod by name or category. To read the mod’s details, click on that mod. Click on the Download button to install it.

Enable and disable mods
Go to the download section. To enable the mod, click on the enable option or click on the disable button to disable it. This is a great thing for testing mods without deleting them.
Launch the game
If you want to play a game, click on “Start Modded” to launch the game with mods. Click on the “Start Vanilla” option to play it.
Update mods when needed
Go to the install tab and click on “Update All” or “Update mods one by one” option.
Remove mods safely
If any mod is causing issues, remove it. Click on the disable button.
How to update the R2 MOD Manager?
Always use the updated version of the mod manager app. Not only the app, but also update the downloaded mods. The updated mods work better and give you the best experience. So, keep updating your installed mods with the new changes and additions. It offers an update button within the app to switch to the latest version of the app.
- Open the app’s settings
- Scroll down until you find the options, “Update All Mods” or “Update Mods one by one”.
- Click on your preferred option to update all mods or one by one. Both options have the same functionality, but updating mods one by one is the best option.
- The R2mod Manager will automatically update every mod.
How to install R2ModMan on Steam Deck?
Downloading this mod manager on a Steam Deck requires a few extra steps. Most of the downloading steps are done on the Desktop Mod because SteamOS doesn’t offer a normal file system like a Desktop OS.
- Open the app’s settings
- Scroll down until you find the options, “Update All Mods” or “Update Mods one by one”.
- Click on your preferred option to update all mods or one by one. Both options have the same functionality, but updating mods one by one is the best option.
- The R2mod Manager will automatically update every mod.
Download R2 Mod Manager
- Before installation, you will require a zip file to run the executable. For this, download the zip file from the homepage of this site.
- Locate the download button (usually at the top of the website), click this button, and wait for the download process.
Install the mod manager
- Now, open the download section of your device and extract the downloaded file into a folder.
- Open the extracted folder and find the executable file that ends with .exe. Double-click on this file and choose the next option according to the screen instructions.
- Choose the direction where you want to save the file, except the r2modman directory.
- Click the install button and wait for a few minutes. As the installation process completes, click on the “Finish” button.
Set a game mod using r2modmanager
- After that, launch the mod manager and choose the game that you want to manage mods for from the list. Use the search box, if don’t see it. Hover the game, choose the option “Select Game” or “Set as default”.
- Now, choose your preferred folder or store to install it. This mod manager automatically detects and manages the game files correctly.
- On the next screen, select the “Existing profile” or “Create a New one” to customize the mod setup the way you want.
- To add the mods, choose the online option from the left menu.
- Use the search bar and search for your favorite game mod
- Always choose the mod after seeing its description, number of downloads, and a download button. For this, click on the Download button and then click on the “Download with Dependencies” option.
- The mod will download. Now, click on the “Installed” button from the left menu, it will display the mods that you have installed.
- Finally, from the top menu, choose “Start Modded” and start playingthe game with proper notifications using the mod.
How to set up the first mod profile?
Your profile allows you to keep your mods separate from others. It helps you to set up different mods and experience them without breaking your main game.
- Go to the R2mod Manager and choose the game you want to mod.
- Create a new profile and give it a clear and proper name to recognize it easily.
- Select this profile before installing any mod.
How to Install Mods Using R2 ModMan?
You can easily install your favorite gaming mods using this fantastic mod manager. It requires a few simple steps to install mods.
- Open the mod manager, click on the “Online‘ option from the left menu.
- Search for the mods that you want to download.
- Click on your preferred mod and choose the install option.
- The r2 modmanager automatically downloads it and set ups for you.
How to manage installed mods in r2mod-man?
Users can easily manage their installed mods using this amazing mod manager.
- OpenFrom the mod manager, go to the “Installed” tab. From there, view and manage the downloaded mods in one place. the mod manager, click on the “Online‘ option from the left menu.
- From the installed tab, you can turn them on or off to test the mods without deleting your games. Disable the mods if you never want to keep them.
- Update the mods from settings by choosing one of your preferred options from “Update all mods” or “Update Mods One by One”.
How to play games with mods?
After setting up the mods, playing games using these mods is easy.
- Choose your preferred profile.
- Now, click on the “Start Modding” option inside the r2modman.
- The game will launch automatically with all enabled mods loaded and ready to use.
If you want to play games without using the mods, click on the “Start Vanilla” option.
Can you share the mod steps in R2Modman?
This mod manager allows you to share the list of your installed mods with your friends to play together for extra fun.
- Open the settings of Mod Manager and click on the profile option.
- Choose “Export profile as code”, and share the generated code.
- Your friend has to paste that code by going into the settings and open profile.
- Now, click on the “Import from code” button to get the same mods and versions instantly.
Conclusion
R2modman is a reliable mod manager, making it easy to install, manage, and customize mods without deleting the original game files. With the step-by-step guide we’ve covered, you now have a clear path to properly set up, experiment safely, and enjoy a smoother and fully customized gaming experience.